 KnowThis
Key Takeaways
Key Takeaways
- 1Primer seals a porous surface so the topcoat absorbs evenly instead of soaking in unpredictably, which is what causes a blotchy, uneven sheen.
- 2Primer blocks stains, smoke residue, and wood tannins from bleeding through into the topcoat — something most finish paints aren't formulated to stop on their own.
- 3Primer gives the topcoat a consistent surface to bond to, which matters most over bare drywall, bare wood, glossy surfaces, or a major color change.
The concept
Once primer is understood as solving three specific problems — uneven absorption, stain bleed-through, and poor adhesion — it becomes clear why skipping it doesn't just risk a slightly worse-looking wall, it risks a specific, predictable kind of failure depending on which of those three problems the surface actually has.
Why does an unprimed drywall patch often show up as a duller or shinier spot after painting, even with the exact same paint used everywhere?
Worked examples
Example 1: Priming bare drywall before the first coat (baseline case)
A newly hung and finished section of drywall gets a coat of primer before any topcoat color goes on. The paper facing and any joint compound over the taped seams are porous and would otherwise absorb the topcoat unevenly, leaving visible flashing where the compound is versus where the plain paper is. The same is true of a compound patch over a repaired drywall crack: priming first seals that porosity uniformly across the whole surface, so the topcoat that follows lands on a consistent surface and dries to an even sheen throughout.
Why is it standard practice to prime new drywall before applying the topcoat color, rather than skipping straight to paint?
Example 2: Repainting a ceiling with an old water stain (edge case / variation)
Why does an old water stain often bleed back through a fresh coat of ordinary topcoat paint, even after the leak itself has been fixed?
Example 3: Painting over a glossy previously painted trim (real-world / applied case)
Someone wants to repaint a set of interior door trim that currently has a high-gloss enamel finish, switching to a new color. Painting a new topcoat directly over the glossy surface risks poor adhesion, since the smooth, hard existing finish gives the new paint very little to physically grip onto, which can lead to peeling or chipping later, especially on a high-contact surface like trim or a door. A bonding primer applied first — sometimes combined with light sanding to add texture — gives the surface enough tooth for the new topcoat to bond securely, addressing the adhesion problem that a glossy substrate specifically creates.
Why is a bonding primer (often paired with light sanding) recommended before repainting a glossy previously painted surface like trim?
How it works (visual)
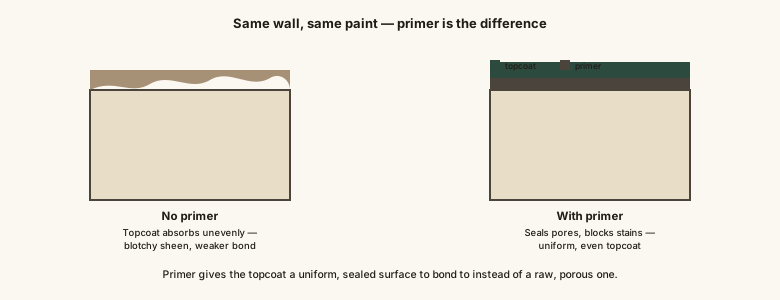
The topcoat itself never changes between the two walls — the only difference is whether it landed on a sealed, uniform surface or a raw, unevenly absorbent one.
Common mistakes
Common Mistakes
Skipping primer on bare drywall or a freshly sanded patch and going straight to topcoat, resulting in visible flashing where absorption differs.
→ Prime any new drywall, patched area, or bare substrate before applying the topcoat, so the whole surface absorbs paint at the same rate.
Painting directly over a water stain, smoke residue, or knot in wood with ordinary topcoat paint and expecting it to stay covered.
→ Use a dedicated stain-blocking primer over any known stain or residue before repainting, since ordinary topcoat paint has no mechanism to stop it bleeding through.
Assuming any white paint labeled 'primer' works the same way as any other, regardless of the actual surface problem being solved.
→ Match the primer type to the actual problem — a sealing primer for porous new drywall, a stain-blocking primer for stains, a bonding primer for glossy or slick surfaces.
Common misconception
“Primer is just a cheaper, thinner version of paint used to save money on the more expensive topcoat.”
Primer is formulated for a fundamentally different job than a topcoat, not a diluted version of it. Its binder-to-pigment ratio, its penetration into porous substrates, and in the case of stain-blocking or bonding formulas, its specific resin chemistry are all built to solve problems — uneven absorption, stain bleed-through, poor adhesion — that an ordinary topcoat paint isn't designed to solve at all, no matter how many extra coats are applied. Using more coats of topcoat paint in place of primer often doesn't fix the underlying issue, because the topcoat lacks the specific properties that make primer effective in the first place.
What to do next
What to do next
- Identify which problem your surface actually has — porous and new, stained, or glossy and hard to adhere to — before picking a primer type.
- Prime any new drywall or freshly patched area before painting, to prevent visible flashing from uneven absorption.
- Use a dedicated stain-blocking primer over any water stain, smoke residue, or wood tannin issue rather than relying on extra coats of topcoat.
- Lightly sand and use a bonding primer before repainting a glossy previously finished surface like trim, cabinets, or doors.