 KnowThis
Key Takeaways
Key Takeaways
- 1A squeak is caused by friction between two surfaces that have worked slightly loose from each other, most often a floorboard and a nail shank, or a subfloor panel and the joist below it.
- 2The looseness usually develops from the same wood-movement cycle that causes gapping — repeated seasonal expansion and contraction gradually works fasteners loose over years.
- 3Fixing a squeak means eliminating the friction (adding a fastener, adding lubricant, or pulling surfaces tightly together), not replacing the board, which is rarely actually damaged.
The concept
Because the root cause is a loosened connection rather than a broken board, most fixes focus on restoring a tight connection — adding a new fastener nearby, or eliminating the friction directly with a lubricant — rather than removing and replacing the flooring itself.
Why does a floorboard usually squeak instead of staying silent, even though the board itself often isn't damaged?
Worked examples
Example 1: A single squeaky floorboard in a hallway (baseline case)
One specific board in a hallway squeaks every time it's stepped on, while the surrounding boards stay silent. This points to a localized loosened fastener at that exact spot — likely a nail whose surrounding wood has shrunk just enough to leave room for the nail shank to rub. Because the issue is isolated to one fastener location, the standard fix is targeted: adding a new screw through the board into the joist below at that specific spot, pulling the two layers tightly back together and eliminating the local friction.
Why does adding a single screw at the exact squeaking spot typically resolve a localized floor squeak?
Example 2: Squeaking from below via an accessible basement ceiling (edge case / variation)
Why might a squeak repair be done from an accessible basement below, rather than through the finished floor above?
Example 3: Widespread squeaking across an entire floor after a dry winter (real-world / applied case)
A homeowner notices squeaking has spread across many boards throughout a room, not just one isolated spot, coinciding with an especially dry winter. This pattern points to widespread seasonal wood shrinkage loosening many fasteners at once, rather than one localized failed connection. The practical response shifts from a single targeted screw to a broader pass — checking and re-securing multiple loose spots — and, longer-term, considering whether indoor humidity is being allowed to swing more widely than it should, since moderating that swing can reduce how much fasteners loosen each winter going forward.
Why does widespread squeaking across many boards, appearing during a dry winter, suggest a different cause than a single squeaky board?
How it works (visual)
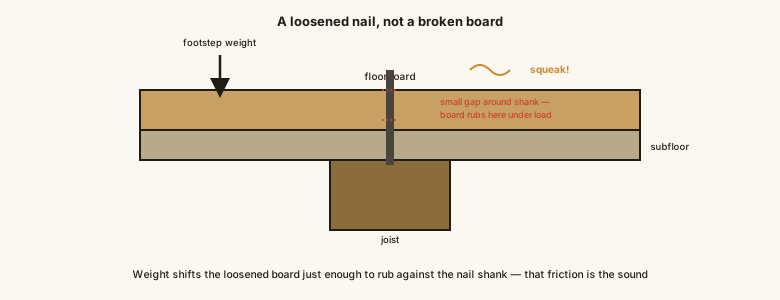
The gap around the loosened nail is what allows the movement — and that movement, not any damage to the board itself, is what produces the sound.
Common mistakes
Common Mistakes
Assuming a squeaky board is damaged and needs to be replaced.
→ Check for a loosened fastener or gap first — most squeaks are a friction problem fixable with a new screw or lubricant, not a damaged-board problem.
Nailing down a squeaky spot instead of screwing it.
→ Use a screw where possible — its threads grip the wood and resist working loose again far better than a smooth nail shank does.
Ignoring widespread seasonal squeaking as unfixable background noise.
→ Address it as a batch (re-securing multiple loose spots) and consider moderating indoor humidity swings to reduce how much it recurs each year.
Common misconception
“A squeaky floorboard means the board is cracked or structurally damaged.”
In the large majority of cases, the board itself is fine — the squeak comes from friction at a loosened connection, most commonly a nail shank that has a small gap around it after the surrounding wood shrank slightly, or a subfloor panel that has separated a fraction of an inch from the joist beneath it. Weight shifting onto that spot lets the loosened surfaces move against each other just enough to create audible friction. The fix that works is almost always about restoring a tight connection (a new screw, an adhesive, a shim) rather than replacing flooring material, and most squeaks can be resolved without removing any visible flooring at all.
What to do next
What to do next
- Identify the exact board or spot that squeaks by walking slowly and noting precisely where the sound occurs, before attempting any fix.
- If the joists are accessible from below (an unfinished basement or crawlspace), try adding shims or fasteners from underneath first, since it avoids any visible repair.
- From above, a long screw driven through the finished flooring into the joist below, with the head countersunk and hole filled, is a reliable fix for an isolated squeak.
- For widespread seasonal squeaking, consider a whole-house humidity strategy (humidifier in winter) to reduce how far indoor wood moisture content swings each year.