 KnowThis
Key Takeaways
Key Takeaways
- 1A window or door unit is sealed and tested on its own, but the gap between its frame and the surrounding wall opening is a completely separate weak point that caulk exists to close.
- 2Small gaps leak disproportionately large amounts of air relative to their size, because moving air funnels through the easiest available path rather than spreading evenly across a wall's surface.
- 3Caulk seals narrow, non-moving gaps (typically under 1/4 inch); wider gaps or anywhere two surfaces move relative to each other need a different product like weatherstripping or expanding foam.
The concept
This is why energy audits specifically check window and door perimeters with tools like a smoke pencil or infrared camera — the leak is rarely coming from the glass itself, it's coming from the framing gap around it.
Why does the gap around a window's frame, rather than the window glass itself, tend to be the bigger source of unwanted air leakage?
Worked examples
Example 1: A properly caulked new window installation (baseline case)
A newly installed window has its entire exterior perimeter gap caulked with a high-quality exterior-rated sealant, following the manufacturer's installation instructions. The window's own factory seal handles air resistance through the unit itself, and the caulk closes the separate installation gap around it — together, this gives the installation continuous air sealing from the glass all the way to the surrounding wall material, with no unsealed path for outdoor air anywhere along the perimeter.
Why does a properly caulked window installation require both the window's own factory seal and a separately caulked perimeter gap?
Example 2: An old window with cracked, missing caulk (edge case / variation)
Why might an older window start leaking air significantly even though the window unit itself hasn't changed?
Example 3: Caulking the wrong type of gap (real-world / applied case)
A homeowner caulks all the way around the moving joint between a window's operable sash and its frame, intending to stop a draft. This actually seals the window shut and can crack shortly after curing, since that specific joint moves every time the window is opened or closed — caulk is a flexible sealant for gaps that don't move relative to each other, not one designed to bridge two surfaces in constant relative motion. The correct product for that specific location, weatherstripping, is designed for exactly this repeated-motion sealing job that caulk cannot reliably do.
Why does caulking a window's operable sash-to-frame joint tend to fail, unlike caulking the fixed perimeter gap between the frame and the wall?
How it works (visual)
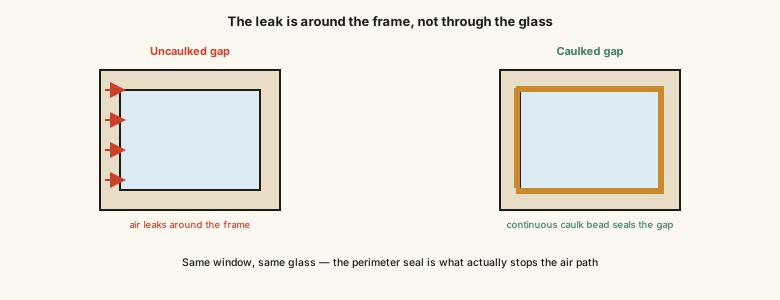
The leak path runs around the frame's perimeter, not through the glass — which is exactly the gap a continuous bead of caulk is meant to close.
Common mistakes
Common Mistakes
Caulking a moving joint, like a window sash-to-frame gap, instead of using weatherstripping.
→ Reserve caulk for fixed, non-moving gaps; use weatherstripping for any joint where two surfaces move relative to each other.
Assuming old, cracked caulk that's still physically present is still doing its job.
→ Inspect caulk periodically for cracking or separation from the surface — degraded caulk should be removed and replaced, not caulked over.
Skipping a backer rod on a gap wider than about 1/4 inch.
→ Push a foam backer rod into wider gaps before caulking, so the caulk has proper depth and shape to flex without cracking.
Common misconception
“Most cold drafts near a window come through the glass itself.”
Modern window glass and factory-sealed frame assemblies are generally not the main source of unwanted air movement. The much more common leak path is the perimeter gap left around a window's frame where it was installed into the wall's rough opening — a gap that exists by design during installation and needs to be separately sealed with caulk. Because moving air takes the path of least resistance, even a narrow, continuous gap around a window's perimeter can carry a meaningful, ongoing amount of conditioned air out of (or outdoor air into) a house, which is exactly why energy audits specifically test window and door perimeters rather than the glass itself.
Try it yourself
A rough illustration of how much heat can escape through a narrow, uncaulked perimeter gap, scaled by the gap's dimensions and the temperature difference between indoor and outdoor air.
What to do next
What to do next
- Inspect the exterior caulk around every window and door perimeter at least once a year, looking for cracking, gaps, or separation from the surface.
- Remove old, degraded caulk completely before applying new caulk — new caulk applied over failed old caulk won't bond or seal properly.
- Use a backer rod for any gap wider than about 1/4 inch before caulking, and choose an exterior-rated, paintable caulk for outdoor applications.
- Reserve caulk for fixed gaps only — use weatherstripping for any joint where two surfaces move relative to each other, like an operable window sash or a door edge.